
Print images at the correct size: PDF scale, pixels and paper
Troubleshoot prints that are too large, too small or cropped using PDF dimensions, print-dialog scaling and a reproducible 1800 × 1200 pixel example.
By PixToPaper Team. Published .
On this page
Check the PDF’s physical dimensions and the print dialog’s scale before changing your image. A sharp image can print at the wrong size because the reader fits a large PDF onto a smaller sheet. A correctly sized PDF can also be shrunk to leave room for the printer’s unprintable edges.
Open PixToPaper to make an image PDF. The converter offers standard paper sizes and Match each image, but it has no custom width, height or DPI control. For an exact 6 × 4 inch image, use a compatible print dialog with a calculated scale, or external page-layout software that lets you specify the image’s dimensions. Choosing Letter and Fit alone does not make a 6 × 4 inch print.
Separate pixels, PDF inches and printer scale
Three different measurements determine the result:
- Image pixels describe the source’s detail. A 1,800 × 1,200 pixel image has a 3:2 shape, but those numbers alone do not define its printed dimensions.
- PDF page and image dimensions describe the digital layout. There are 72 PDF points per inch. The page can be larger than the image placed inside it.
- Print scale determines how that layout is mapped onto physical paper. At 100%, a 6 inch-wide image in the PDF is nominally 6 inches wide on paper. Fit or a printer-driver adjustment can change that.
Pixels per inch (ppi) describes how densely source pixels are placed at a chosen physical size. Printer dots per inch (dpi) describes the printer’s dots, not the number of source pixels. For planning, divide pixels by the intended inches:
1,800 ÷ 6 = 300 ppi; 1,200 ÷ 4 = 300 ppi.
That makes 1,800 × 1,200 pixels a useful 6 × 4 inch target at 300 ppi. It is not a universal print-quality guarantee: source sharpness, subject detail, viewing distance, paper and printer all matter. Changing a metadata field to “300 DPI” does not create missing detail, and PixToPaper does not use that metadata to set image-sized page dimensions.
For compression choices, see PNG vs JPG for PDF. For paper dimensions and fit-versus-fill examples, see A4 vs Letter PDF.
Reproduce the same image on two PDF page sizes
Use this original 1,800 × 1,200 pixel demonstration PNG. It is a labeled test image, not a photograph of a print. Keep it unrotated and do not crop it: changing its dimensions changes this example.
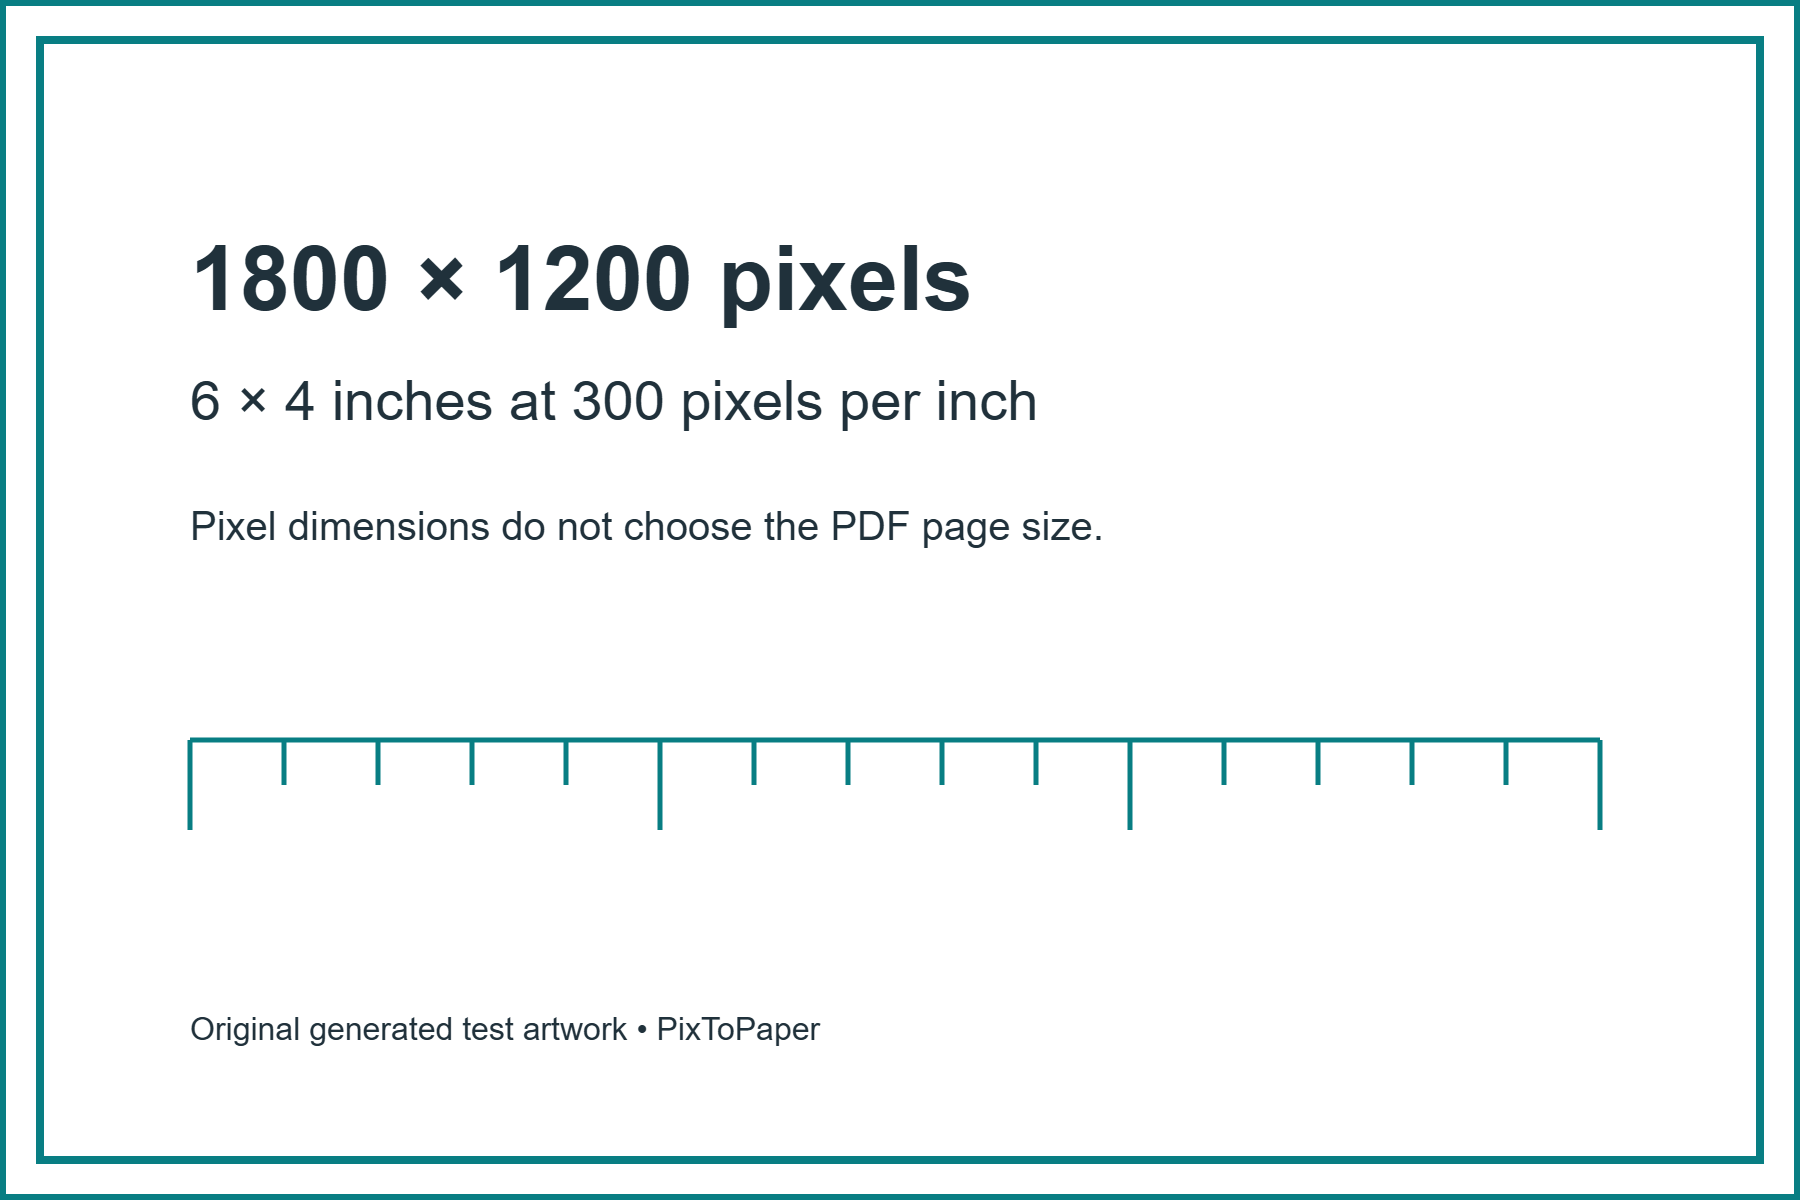
- In PixToPaper, select Choose images and add the PNG.
- Open PDF settings. Set Page size to Match each image, Orientation to Automatic, Margins (mm) to 0, Image placement to Fit the whole image, and Image quality to Lossless — larger file.
- Select Preview pages to check the full image, then close the preview. Select Create PDF, then Download PDF. This is the image-sized version.
- Change Page size to US Letter (8.5 × 11 in) and Orientation to Landscape. Leave margins, placement and quality unchanged.
- Preview and create the PDF again, then download the Letter version. Save the two files with distinct names.
Compare your exports with the image-sized example PDF and the landscape Letter example PDF.
| Layout | PDF page geometry | Image content geometry at 100% |
|---|---|---|
| Match each image, Automatic, zero margins | 1,350 × 900 points = 18.75 × 12.5 inches | 18.75 × 12.5 inches; image fills the page |
| US Letter, Landscape, zero margins, Fit | 792 × 612 points = 11 × 8.5 inches | 792 × 528 points = 11 × approximately 7.3333 inches |
In the Letter PDF, the 3:2 image fits the page width and is centered vertically. The remaining 84 points of page height form two 42-point white bands, approximately 0.5833 inches each. These are layout whitespace, even though Margins (mm) is zero.
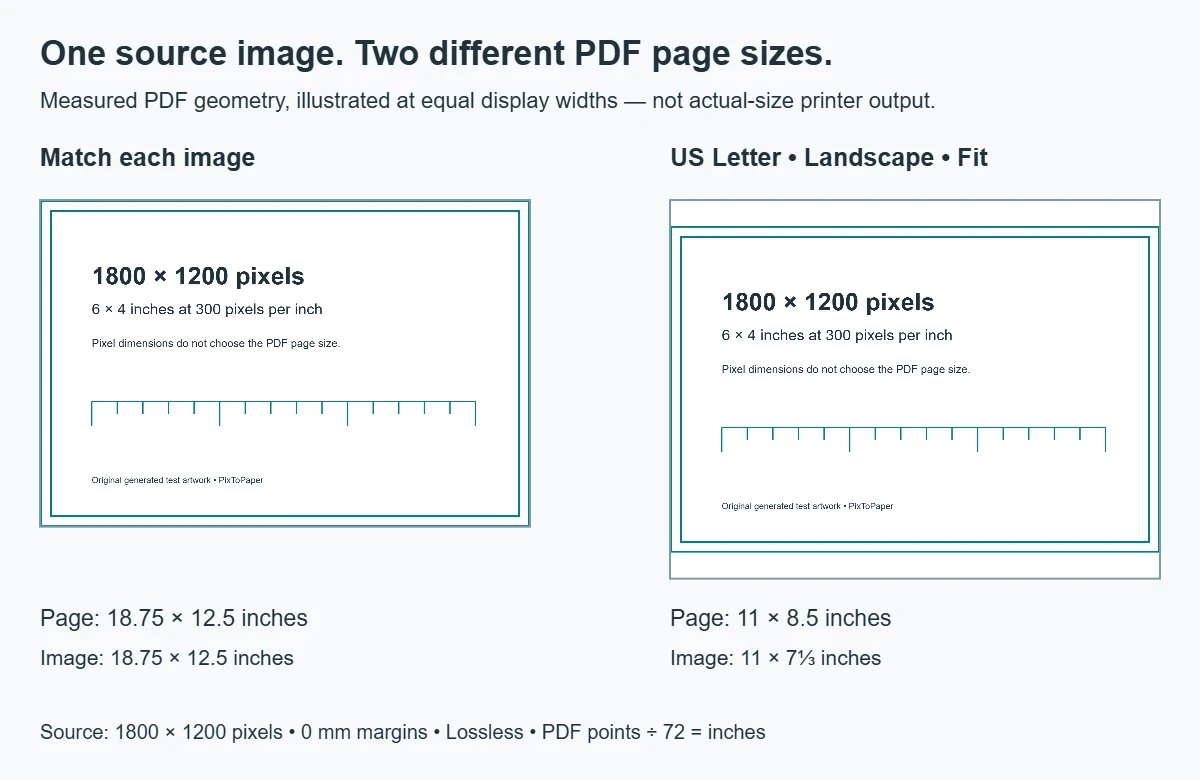
Match each image normally uses a 96 ppi page-sizing convention: 1,800 ÷ 96 = 18.75 inches and 1,200 ÷ 96 = 12.5 inches. Added margins enlarge this page, forced orientation can change its layout, and exceptionally large pages are limited to 200 inches per side. The zero-margin, unrotated example avoids those differences.
Lossless — larger file is used here to avoid JPEG compression, not to set physical size. It still renders the edited image and can reduce large sources under its 8,192-pixel edge and 16-million-pixel limits. This 1,800 × 1,200 source is below both limits. Lossless does not promise that every original file’s full resolution will be retained.
Choose the print-dialog setting for your goal
Open the downloaded PDF in your PDF reader and inspect its print preview. Labels vary across readers, browsers and printer drivers; do not assume the browser’s default is 100%.
| Setting | What to expect | When it helps |
|---|---|---|
| Actual size or 100% | Keeps the PDF’s nominal physical scale; content outside the printable area can be clipped | A PDF whose image dimensions already match your target |
| Fit | Enlarges or reduces the page to fit the selected paper’s printable area | Keeping the whole page on a sheet when exact dimensions are not required |
| Shrink oversized pages or a similar Shrink option | Reduces oversized pages but leaves smaller pages at their existing scale | Avoiding enlargement while accommodating a large page |
| Custom Scale | Applies the percentage you enter | A calculated target size, if the reader and driver support it without further scaling |
Adobe’s Scale or resize PDF pages explains Fit, Shrink oversized pages and Custom Scale. In Acrobat, open Print, then use Page Sizing & Handling → Custom Scale to enter a percentage. Other apps may put equivalent controls elsewhere or omit them.
For the image-sized example, 100% means 18.75 × 12.5 inches, not 6 × 4. It is larger than Letter paper, so Actual size can clip it. Fit makes it fit the available sheet, but the resulting size depends on the paper, orientation and printable area.
For the Letter example, 100% means an image 11 inches wide, with the white bands described above. It does not mean a 6 inch-wide photo. Fit can reduce it further because most printers cannot print to the edge of an ordinary Letter sheet.
Calculate a nominal 6 × 4 inch print
For the unrotated, zero-margin image-sized example only, calculate:
Custom scale = desired width ÷ PDF image width × 100
6 ÷ 18.75 × 100 = 32%.
The height agrees: 12.5 × 0.32 = 4 inches. At that scale the page and image become nominally 6 × 4 inches. The original 1,800 × 1,200 pixels then correspond to 300 ppi.
To try this, open the image-sized PDF in a reader with Custom Scale, select paper large enough for the 6 × 4 image plus any required printer margins, and enter 32%. Check the print preview for the complete image. Avoid an additional Fit or enlargement option in the printer driver. Reader and driver support varies; if you cannot control scaling reliably, place the image at 6 × 4 inches in external page-layout software and export a suitably sized PDF instead.
The 32% result is arithmetic, not a physical-device test. It does not establish that a particular printer will output exactly those dimensions. It also does not apply unchanged to the Letter version, a cropped or rotated source, or an image-sized export with added margins.
Check paper, margins and borderless mode
Before printing, check all three places where paper and scale can disagree:
- The PDF: confirm its page dimensions and whether the image fills the page or sits inside whitespace.
- The reader’s Print dialog: select the paper actually loaded and the intended orientation. Check whether Fit, Shrink or a percentage is active.
- The printer’s properties: confirm paper size, paper type and any scaling or borderless option. A second automatic enlargement can undo your reader setting.
A4 and Letter are different sizes. Selecting A4 in the dialog while loading Letter, or vice versa, can change scale or clip edges. The correct paper setting is still necessary when a small image is centered on a larger sheet.
A zero-margin PDF is not a borderless-printing instruction. Many printers leave an unprintable strip around the sheet. At 100%, edge content may be clipped; Fit may keep it visible by shrinking the page. Borderless modes may enlarge content beyond the paper edges to prevent white slivers, which can crop labels and change size. Availability and behavior depend on the printer, paper and mode.
For an exact-size image that does not need to touch the paper edge, using a larger sheet with room around it is often easier than relying on borderless mode. Trim afterward if appropriate. PixToPaper’s Fill the page is a digital crop choice, not a way to overcome printer margins.
Print one sheet and measure before a batch
A preview checks layout; it cannot verify a physical printer. Make one inexpensive test before printing several copies.
- Use the linked demonstration source and PDF so the intended image boundary is identifiable. Record which PDF you used, loaded paper, orientation and scale.
- Print one sheet without additional automatic scaling. If checking the calculated example, start with the image-sized PDF at 32%.
- Measure between the outside edges of the teal perimeter in both directions, not the outer paper edge or the inset decorative frame. The perimeter identifies the full image boundary. The nominal 6 × 4 inch target is 152.4 × 101.6 mm.
- If both measurements are proportionally too small or too large, revisit reader and driver scaling. If edges disappear, check printable margins, paper mismatch, borderless expansion or a Fill crop. Do not compensate for cropping by guessing a new percentage.
- Keep the successful settings with the file, then print the remaining copies. If dimensions are critical for a template or technical task, check the required tolerance rather than judging by eye.
Print at the right size first, then assess detail. If the dimensions are correct but text or edges are soft, inspect the source pixels and export quality rather than changing paper scale. PNG vs JPG for PDF explains those quality tradeoffs.
Sources and the limits of this example
- Adobe: Scale or resize PDF pages documents reader scaling controls; it does not verify PixToPaper output or your printer.
- Adobe: Image resolution guide distinguishes image pixels from printer dots and discusses resolution, viewing distance and paper. We use 300 ppi as a planning example, not a universal minimum or guarantee.
The downloadable PDFs and geometry illustration document digital page layout. The 300 ppi target and 32% scale are calculations. No physical printer, paper or borderless mode was tested for this guide, and the illustration is not evidence of print accuracy. References are explanatory sources, not endorsements. Our editorial method explains how to distinguish reproducible examples from their limitations.
Read how these guides are produced and checked, or report a correction. Examples use demonstration files, not visitors' documents.