
Why do images look blurry in a PDF? Practical fixes
Diagnose blurry image-to-PDF output with an original downloadable comparison, source-resolution checks, export settings and print-size calculations.
By PixToPaper Team. Published .
On this page
A PDF cannot restore detail that was missing from the image. If the original is sharp but the exported PDF looks soft, check image compression, any downscaling and how large the image is displayed or printed. A low-resolution source, an aggressively compressed export and an enlarged view are different problems; they need different fixes.
Open PixToPaper to try the examples. This guide is about diagnosing readability, not promising that a setting will sharpen every source. For the basic workflow, use how to convert images to PDF.
First compare the original with the downloaded PDF
Use the original file, not just the converter thumbnail. A thumbnail is intentionally small, and Preview pages checks page layout rather than the final export’s compression quality.
- Open the original image at a useful inspection scale. Check whether small text and edges are already soft, blocky or unreadable.
- Create and download the PDF. Open that actual file in a PDF reader, rather than inspecting only the page preview.
- Compare the same detail at a similar displayed size. A whole image shown in a small window can look sharp while an enlarged crop reveals missing pixels.
- If the original itself lacks detail, look for the original-resolution download, a better scan or a new photograph. Changing quality cannot recover letters that were never readable.
A PDF reader’s 100% view is not necessarily a one-image-pixel-to-one-screen-pixel view. It maps PDF page dimensions to the screen, and display scaling varies. Use comparable visual sizes for an on-screen comparison; use intended physical dimensions when planning print detail.
A real comparison: fewer pixels, the same PDF layout
We created two original demonstration images from the same text-and-lines artwork: 1,200 × 800 pixels and 300 × 200 pixels. These are generated test images, not visitor documents or scans. The smaller version has one quarter as many pixels along each side and one sixteenth as many pixels overall.
Both were exported together using US Letter, Landscape, 0 mm margins, Fit the whole image, and Lossless — larger file, without crop, rotation or flip. Both PDF pages are 792 × 612 points. Each image occupies 792 × 528 points, so the smaller source is not being placed in a smaller rectangle.
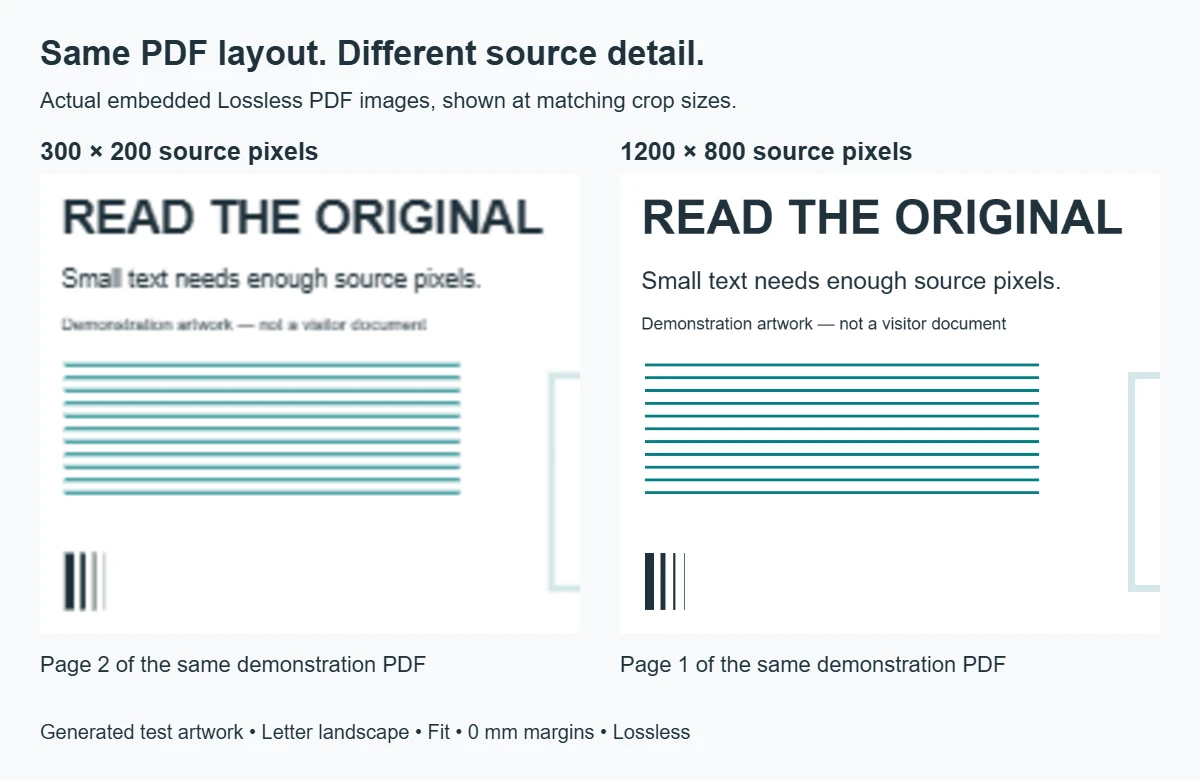
Repeat the example with the 1,200 × 800 source PNG, 300 × 200 source PNG, and actual two-page Lossless PDF. The larger source is page 1; the smaller source is page 2. Use the same layout settings and compare the lettering in your downloaded file.
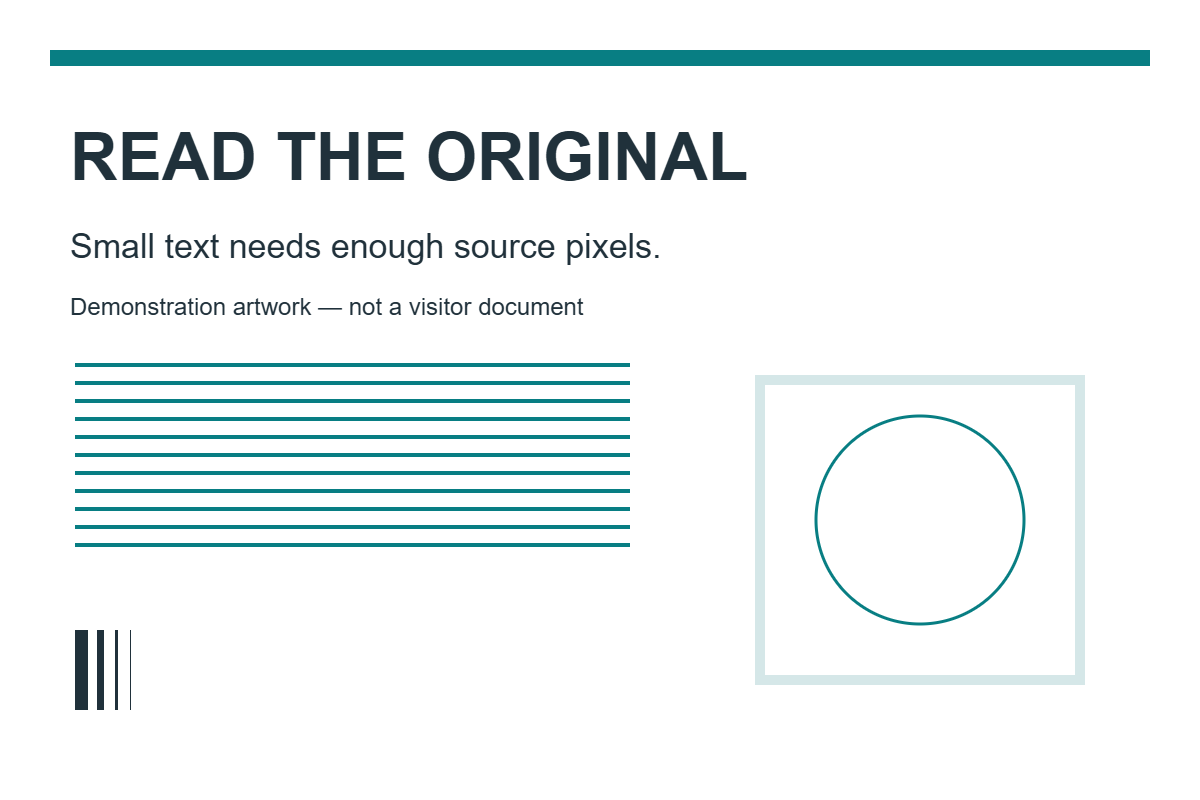
The lesson is specific: lossless encoding avoids an additional JPEG-compression step, but it cannot make the 300-pixel-wide source contain the detail of the 1,200-pixel-wide source. Merely saving the small PNG as a larger PNG does not recreate the original detail.
Choose export quality for the source you have
For screenshots, diagrams or scans with small text, start with Lossless — larger file. In PixToPaper this encodes the rendered image as PNG rather than JPEG. It is not an untouched copy of the original source bytes, and browser-safety limits still apply.
| Setting | Current rendering limit | Useful starting point |
|---|---|---|
| Lossless — larger file | At most 8,192 pixels on the longest edge and 16 million rendered pixels | Small text, line drawings and flat artwork |
| High — balanced size | At most 3,200 pixels on the longest edge; JPEG encoding | Photos where readability and file size both matter |
| Compact — smaller file | At most 1,600 pixels on the longest edge; stronger JPEG compression | A smaller download when the remaining detail is sufficient |
A limit is a maximum, not a promise to enlarge small images to that size. A very large screenshot can lose fine detail when downscaled even with Lossless. High and Compact can both reduce resolution and introduce JPEG artifacts, such as softened letter edges or blocks around high-contrast detail.
If changing quality improves an export, keep the least-compressed version that meets your file-size constraint. If none improves it, revisit source quality and viewing size. The PNG vs JPG guide includes separate measured file-size and compression comparisons; this guide’s example isolates source resolution instead.
Check how many pixels cover the intended print size
For a placed image, calculate:
Effective pixels per inch = image pixels ÷ placed image size in inches.
In our Letter example, both images are 11 inches wide in the PDF. The 1,200-pixel source provides approximately 109 pixels per inch across that width; the 300-pixel source provides approximately 27 pixels per inch. Those are digital-layout calculations, not a claim about a tested printer.
For comparison, a 6 × 4 inch image at a 300 pixels-per-inch planning target needs 1,800 × 1,200 pixels. The appropriate target depends on content, viewing distance and output equipment. A sharper original is still necessary: enough pixels do not make an out-of-focus photo sharp.
Changing a file’s DPI metadata to 300 does not create new source detail. PixToPaper’s Match each image normally sizes pages at 96 pixels per inch, rather than using that metadata as a physical-size instruction. It does not provide a custom DPI or inch-size control. See printing images at the correct size for a reproducible page-size example and print-dialog scaling.
Fix the source without adding avoidable damage
Choose the remedy that matches the problem:
- A downloaded preview or thumbnail: obtain the original-resolution image if available. Enlarging the preview is not equivalent.
- A screenshot of a photograph or document: use the original image or scan. A screenshot adds a screen-resolution limit and may capture interface elements.
- An out-of-focus scan or photo: capture it again with better focus, steady framing and readable lighting. Export quality cannot reliably reconstruct unreadable text.
- A repeatedly edited JPG: return to the earliest good original and avoid unnecessary JPEG re-saves. Renaming it
.pngdoes not undo earlier compression. - A sharp source exported with Compact: try High or Lossless, recreate the PDF and compare the actual downloads.
- A source stretched across too much paper: reduce the placed size if your task permits, or obtain a higher-resolution original. Changing margins is not a resolution repair.
Crop unwanted surroundings only when that helps the actual composition. Cropping does not increase the remaining detail; filling a page with a smaller crop can enlarge it further. Preserve the original before editing, and check that signatures, labels or page edges are not removed.
A quick PixToPaper readability check
- Add the best original file with Choose images.
- Open PDF settings and select the required Page size and Orientation. Choose Fit the whole image when every edge matters.
- Start with Lossless — larger file for small text, within the documented limits.
- Use Preview pages to check layout, not to certify compression quality.
- Select Create PDF, then Download PDF. Inspect the actual output at its intended viewing or print size.
- If you change settings, create and download the PDF again. Keep the readable result, not an older download generated with different settings.
Image-to-PDF conversion creates raster image pages; it does not turn photographed or screenshot text into searchable text. OCR and editable text are separate workflows and are not features of this converter.
Sources and the scope of the comparison
Adobe’s image-file-format guide explains pixel-based raster images and why scaling affects their appearance. Adobe’s image-resolution guide discusses pixels, printer dots and resolution planning.
Our comparison uses original generated artwork and actual browser-generated PDFs checked on October 1, 2026. We inspected PDF page dimensions and embedded image dimensions; the illustration uses crops of those embedded image pixels. It is not an evaluation of a physical printer, every PDF viewer or every user’s source file. References explain concepts and are not endorsements. Read our editorial method for how examples and limitations are documented.
Read how these guides are produced and checked, or report a correction. Examples use demonstration files, not visitors' documents.